【Hugo】Github ActionsでS3に自動でデプロイする【サイト構築③】

HugoをGithubにプッシュした際に、自動でAWS S3にデプロイする方法を紹介します。
必要な手順としては、AWS IAMロールの設定およびGithub Actionsの設定のみになります。
IAMロールの設定
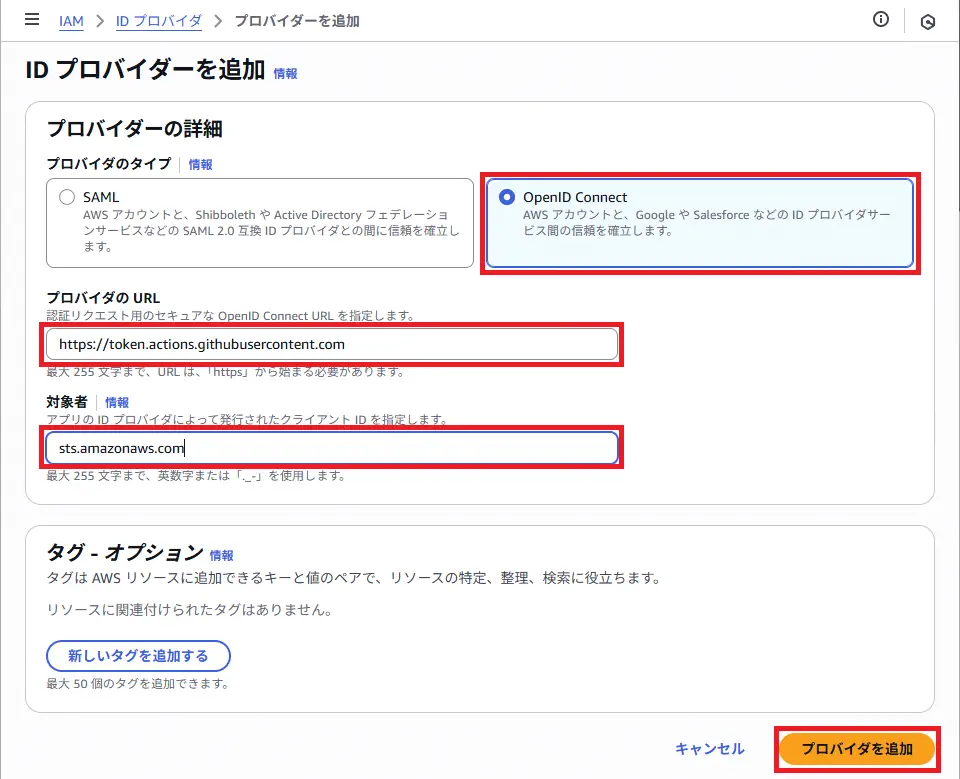
まずは、AWS IAMコンソールの「IDプロバイダ」から、OIDCプロバイダの設定を以下の様に行います。
OIDCプロバイダとは、AWSに信頼できる外部の認証元として登録するサービスのことです。AWSとGitHub Actionsを連携させるために設定するために必要になります。
IDプロバイダーの追加画面で、以下の通りに設定します。
- プロバイダのタイプ:
OpenID Connect - プロバイダのURL:
https://token.actions.githubusercontent.com - 対象者:
sts.amazonaws.com
続いてIAMロールを作成します。ロール名は分かれば何でも良いですが、今回はblog_github_action_roleとします。
作成したロールの信頼ポリシーの編集で、ポリシーを以下の通りに設定します。それぞれ、AWSアカウントIDとGitHubユーザー名・リポジトリ名を指定します。
 1{
 2  "Version": "2012-10-17",
 3  "Statement": [
 4    {
 5      "Effect": "Allow",
 6      "Principal": {
 7        "Federated": "arn:aws:iam::<AWSアカウントID>:oidc-provider/token.actions.githubusercontent.com"
 8      },
 9      "Action": "sts:AssumeRoleWithWebIdentity",
10      "Condition": {
11        "StringLike": {
12          "token.actions.githubusercontent.com:sub": "repo:<GitHubユーザー名>/<GitHubリポジトリ名>:*"
13        }
14      }
15    }
16  ]
17}
ここまででAWS側の設定は完了です。
Github Actionsの設定
続いて、ワークフローを定義するファイルの作成と、Github Actionsの設定になります。
GitHubリポジトリの.github/workflowsディレクトリにbuild-deploy.ymlを配置します。ファイルは以下の様にします。
 1name: build-deploy
 2
 3on:
 4  push:
 5    branches:
 6      - main
 7
 8jobs:
 9  build-deploy:
10    runs-on: ubuntu-latest
11    timeout-minutes: 10
12    permissions:
13      id-token: write
14      contents: read
15    steps:
16      - name: Get Latest Hugo Version
17        id: hugo_version
18        run: |
19          latest=$(curl -s https://api.github.com/repos/gohugoio/hugo/releases/latest | jq -r '.tag_name')
20          echo "version=${latest#v}" >> $GITHUB_OUTPUT
21      - name: Install Hugo CLI
22        run: |
23          wget -O ${{ runner.temp }}/hugo.deb https://github.com/gohugoio/hugo/releases/download/v${{ steps.hugo_version.outputs.version }}/hugo_extended_${{ steps.hugo_version.outputs.version }}_linux-amd64.deb \
24          && sudo dpkg -i ${{ runner.temp }}/hugo.deb
25      - name: Checkout
26        uses: actions/checkout@v4
27        with:
28          submodules: true
29          fetch-depth: 0 # enableGitInfoでの取得用
30      - name: Build Hugo
31        run: hugo --minify --buildFuture
32      - name: Configure AWS Credentials
33        uses: aws-actions/configure-aws-credentials@v4
34        with:
35          aws-region: ap-northeast-1
36          role-to-assume: arn:aws:iam::${{ secrets.AWS_ACCOUNT_ID }}:role/blog_github_action_role # ロール名
37          role-session-name: GitHubActions-${{ github.run_id }}
38          role-duration-seconds: 900
39      - name: Upload files to the production website with the AWS CLI
40        run: |
41          echo "uploding to s3 ..."
42          aws s3 sync public s3://${{ secrets.S3_BUCKET }}/ --size-only --delete
43          aws cloudfront create-invalidation --region ap-northeast-1 --distribution-id ${{ secrets.DISTRIBUTION_ID }} --paths "/*"
ここで、36行目に今回作成したIAMのロール名を指定します。
ワークフローの内容としては、mainブランチにプッシュされた時に、HugoのビルドとAWS S3へのデプロイを行います。Hugoは最新バージョンを取得しビルドするようにしています。
また、36行目でfetch-depth: 0としているのは、記事の最終更新日を設定する際に、過去のコミットの日時も取得するためです。
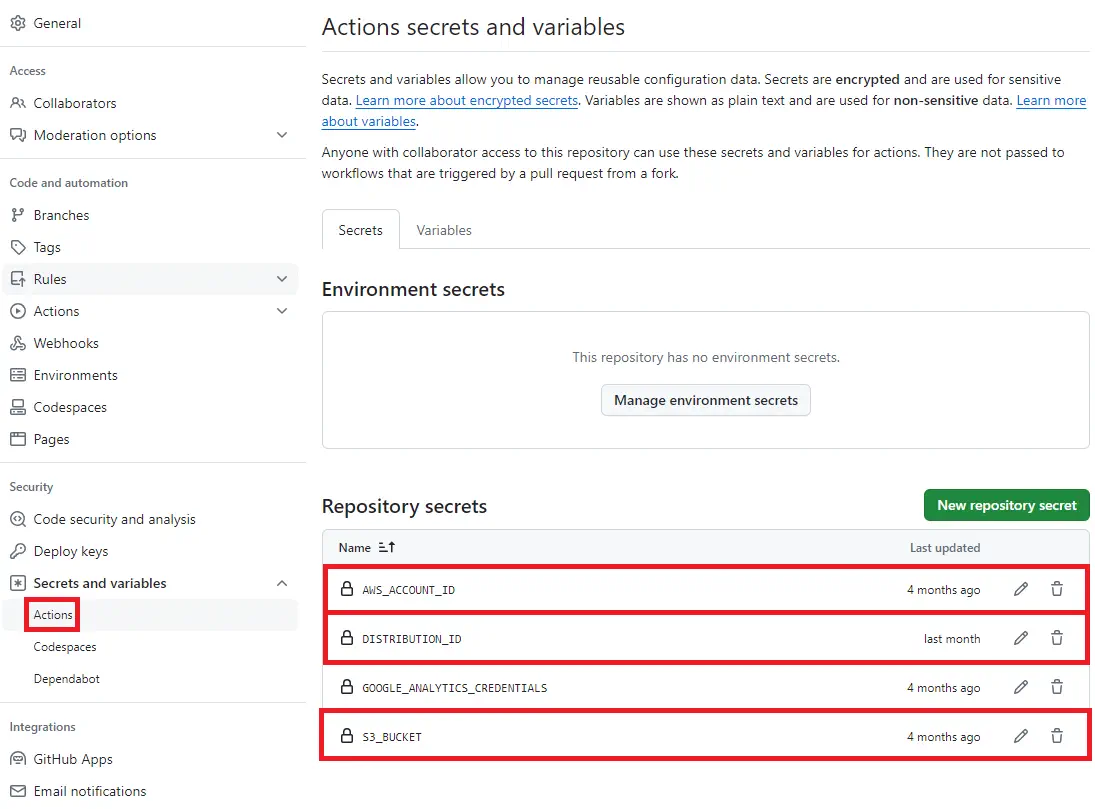
次に、GitHubのリポジトリ設定で、「Secrets and variables(Actions)」の設定画面で、Repository secretsに変数を以下の通りに設定します。
AWS_ACCOUNT_IDにAWSのアカウントID、S3_BUCKETにS3バケット名、DISTRIBUTION_IDにはディストリビューションIDを設定します。
AWS_ACCOUNT_ID:AWSのアカウントIDS3_BUCKET:AWS S3のバケット名DISTRIBUTION_ID:Amazon CloudFrontのディストリビューションID
ここまでで、必要な設定は完了になります。これでプッシュ時に自動でS3にデプロイできるようになりました。
実際にGitHubにプッシュし、GitHub Actionsの画面から処理が実行されること、処理実行後にサイトに更新が反映されていることが確認できたら成功です。
ここまででHugoブログの構築が完了となります。以上で記事を終わりにします。